Using SQS Queues with PowerShell

I wanted to look at connecting two disparate systems for a recent project. The goal was to be able to enter information into one system and have information processed by another system. The systems have no direct authentication trusts between them but they are both running on Amazon Web Services EC2 platform. This was a perfect use for the decoupling nature of the Amazon Simple Queue Service and I wanted to come up with a proof of concept, which is outlined below.

Before getting into any details, I want to make clear that this is not a best practice use case of SQS. For most uses of SQS there is a need to keep track of the messages being processed in some kind of permanent state such as a database. With a persistent data store containing the processed messages, the queue workers can more effectively process messages if messages are delivered one or more times. That being said lets go over this proof of concept.

Assuming AWS keys with correct permissions are configured and the AWSPowerShell module is loaded, the below command will create a new SQS queue with PowerShell. The command returns the created queue url which will be stored in a variable $NewSQSQueueUrl for future use.

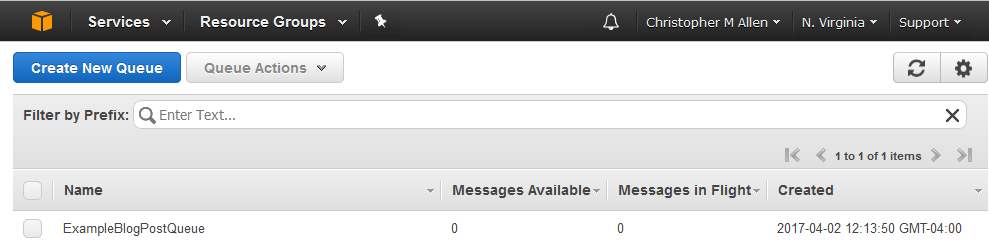
A quick peek at the SQS console to ensure the queue was created.

This next bit creates an array of strings which will serve as some example information to share between the systems. For this proof of concept I am sending example PowerShell parameters into the SQS queue.

I have written the POC functions which are also uploaded to my GitHub PowerShell repo that get dot sourced. These functions put the information (example parameters) into the new SQS queue as message attributes of the newly created SQS message.

After running these functions the message ids are returned to the PowerShell host indicating the messages have been inserted into the SQS queue successfully.

Below is the function that was dot sourced that did the uploading. You could customize this to fit your use case with some help from the AWS Send-SQSMessage cmdlet documentation.

With messages being put into the queue, I need a function to pull down the messages and process them on the queue worker system (aka the SQS message receiver). My goal is to take different actions on the queue worker system based on the message attributes of the SQS messages pulled out of the queue. That function looks something like this.

This function isn’t actually doing anything interesting with the messages other than generating some output to the PowerShell streams but this is a proof of concept after all :).

Considerations when using SQS

As SQS is designed to decouple distributed systems, SQS does not assume every message pulled from the queue has been processed successfully. Messages that are pulled from the queue are hidden from the queue until the message visibility timeout period has passed. It is up to the queue workers to delete the messages from the queue after the message has been processed. This is why at the end of the function above, messages are deleted from the queue with the Remove-SQSMessage cmdlet.

After working with SQS a bit, I noticed that the behavior surrounding the delivery of messages sitting in the queue is a little unintuitive. For example, say there are 8 messages in a queue and I request for up to 10 messages to be received with Receive-SQSMessage. A logical assumption would be that all 8 messages are returned but that is rarely the case. After working with some messages in queues it becomes quite apparent that SQS will return a random number of messages. Additionally without using FIFO (First-In First-Out) queues, the messages will often be delivered out of order.

Another bit of a gotcha I ran into at first was that by default, Recieve-SQSMessage will not return any message attributes from SQS. The resulting Amazon.SQS.Model.Message object that was returned had blank MessageAttributeValues until I specified “-MessageAttributeName All” parameter.

Hopefully the above considerations will shed some light on the way the function is written. I wrote it so that it could be run repeatedly from a parent polling script and that it could handle one more more message objects being returned from each poll of SQS.

Back to the functions

Finally, we get to the polling function portions of the script which could run on scheduled intervals via task scheduler. This function first checks a queue for the existence of messages using the Get-SQSQueueAttribute cmdlet. If messages are found in the queue, it will invoke the Start-SQSQueueProcessing function referenced above to handle the messages. I make use PowerShell transcription to keep a log for now. If this ever moves out of proof of concept, logging could be improved quite a bit to make it cleaner.

This is the POC Queue polling function.

How I envision the script being called ala cron or task scheduler for regular execution would be something like…

What does it look like when ran you may be wondering?

The PowerShell transcript output captures the same information. As you may have noticed, the body of the generated SQS messages contains information on who created the SQS message and when it was created which could help for audit trails.

Thanks for following along and happy scripting!

Load PowerShell profiles for scheduled tasks script execution

I stumbled upon an interesting bug today. I tested some PowerShell scripts running from task scheduler on Windows Server 2012 R2 and everything executed fine. However, when I configured the scheduled task for daily execution and checked the log output the next day, the script had failed. None of the service account’s PowerShell profiles loaded and the functions I needed were unavailable. This was odd because I tested this entire process the day before, the only difference I could think of was that I was logged in interactively with that service account when I tested the scheduled task the day before.

Armed with this hunch of an assumption I went to the search engines and eventually found Microsoft hotfix 3133689.

So if you ever need to load PowerShell profiles for scheduled tasks, you are going to need that hotfix. Obviously there are much cleaner ways to do what I was trying to do. Additionally having profile dependencies in your scripts or allowing interactive sessions for your service accounts are both far from best practice.


Configure Visual Studio Code to run Python on Windows

Recently I was looking at my IDE options for writing some python applications. I really want to get more familiar with Visual Studio Code so I picked that to begin learning on. My only requirement was to pick an IDE I could use on both Windows and Linux. I know that many other IDEs are more polished and would be easier to configure but I wanted to challenge myself a little.

After I downloaded the latest version of python, I installed python via the executable installer. During the install there is a check box you can select to add python to your path, so I chose that option.

Next up I downloaded Visual Studio Code and also used the executable installer. Again there is an option to add Visual Studio Code to the path environment variable, so I chose that option as well. After a reboot my path looked like this.

You can see the paths to python and Visual Studio Code are present. This should make working with these new tools a bit easier. To make sure I could run python from the shell, I went ahead and launched python from the PowerShell console and outputted some Hello World.

With shell execution confirmed it was time to move on to the IDE configuration. I opened Visual Studio Code and installed the python extension. Then I opened a folder I created in My Documents for python scripts within Visual Studio Code. I had already picked up that opening up a folder in VS code was a first step to code execution from some earlier learning on Ubuntu with PowerShell and Dot NET Core. Inside that new folder, I created HelloWorld.py with a simple print Hello World line. When I went to run the HelloWorld.py with Control+Shift+B, I hit a wall. No task runner configured error. That is where I discovered I needed to configure the task runner to be able to execute python from Visual Studio Code. To configure the task runner, open the command palette either through the Menus via View -> Command Palette or use the keyboard shortcut Control+Shift+P and type Task Configure, to find the configure task runner selection. Then Choose Other, and make your tasks.json look like this:

All I needed to change was the “command” line to python and the “args” line to [“${file}”], once that was done I was able to execute python from Visual Studio Code as seen below.

Credit to codingisforyou on youtube for making a video covering this as well as diving a bit deeper into the debugging configuration of VS code. In his video he needed to include the full path to the python executable including escaping some of the backslash characters, which I assume is due to python not being in his environment variables.

Now my python environment inside Visual Studio Code is all configured and actually looks like the Microsoft Documentation.


Create VPC Security Groups, Rules, and Tags with PowerShell

Here is some example code which may help you automate security group creation with PowerShell. I wanted to take a look at automating some security group creation tasks today and there wasn’t too much help available via search engines. Maybe this post will help that out a bit.

The minimum amount of IAM permissions needed to accomplish this task will be:


This snippet of powershell will:

  • Lookup the only VPC in your account, provided your regional defaults are set via Initialize-AWSDefaults or the ec2 instance you are running this on. This is helpful as some of the powershell cmdlets only play nice with the default vpc, which many people tend to delete.
  • Create a new security group for a load balancer
  • Allow HTTP and HTTPS traffic ingress into the load balancer security group
  • Create a new security group for a web server
  • Allow HTTP from the load balancer to the web server security group
  • Allow SSH from a security group that is looked up by the name “My Bastion Host Security Group” to the web server
  • Name Tag the created security groups

Lets try running some AWS PowerShell functions on Linux

Today I am going to attempt to take some PowerShell functions I wrote on Windows and run them on Linux. This should all be possible now that Microsoft Loves Linux! With the new .Net (core) going open-source and cross platform combined with AWS’s Tools for PowerShell core, I should be able to run the exact same functions across Windows and Linux.

For this exercise I will be using a Ubuntu virtual machine on Hyper-V but this could easily be done on CentOS or other various linux distros. Microsoft recently added support for installing PowerShell through popular distro’s default package managers so we will take that approach to get up and running.

Enough intro lets get to it! I am going to use Microsoft’s provided steps in a bash terminal window to register the Microsoft repo and get the latest PowerShell 6 alpha installed and running.


Installing PowerShell

After running those commands, PowerShell is installed and the system leaves us at the PowerShell command prompt.

To verify everything is working I can use $psversiontable to output our PowerShell info to the host.

Okay, everything is looking good so far.

Loading AWS Tools for PowerShell Core

Next up is to get AWS Tools for PowerShell core loaded. This can be done with the new PowerShell package management cmdlets specifically Install-Module.

Oh No, a red error appeared! Quick, email this error to our System Administrator to figure out what went wrong! Haha, just kidding. Lets read it.

The error says administrator rights are required to install modules. The suggestions are to try to change the scope via parameter or to use elevated rights. Well, run as administrator sure won’t work on Linux, so I will do the equivalent and exit out of PowerShell then sudo powershell back into the PowerShell host.

After a retry of the Install-Module command from the now elevated PowerShell host, the Install-Module command completes without error.

I want to check to see the available modules with the get-module command and verify the AWSPowerShell.NetCore module is listed now that its installed.

Everything checks out and the AWS module is listed right at the top.

Loading my AWS functions from GitHub

I don’t plan on doing any editing of my functions or commits from this system, so I can skip configuring Git and just install it right from the package manager. The neat thing about using Git is that all the nuances that come from working on files between *nix and Windows, like different carriage returns, should be handled behind the scenes by Git.

Once git is installed I can clone the PowerShellScripts repository from my github.

A quick ls and cd is used to make sure the AWSFunctions folder came down with the repository.

Creating AWS Read Only Access Keys

Since this is just a proof of concept exercise, I am going to run a function I built to check the status of a running EC2 Instance by looking up its Name tag. The only access I need for this in AWS IAM is the ability to describe my instances so we can create a new IAM User with an attached EC2 Read only policy.

The IAM console has really become simple to use with recent updates but lets cover everything step by step.

First I’ll log into my AWS account and navigate to the IAM console. From there I want to choose Users and then use the Add User button.

I will call the user blogpostec2readonly and check the box for programmatic access, which will generate our access keys.

On the next screen I will choose Attach existing policies directly. The filter box directly below can be used to search for “ec2readonly” and an AWS managed policy for EC2 Read Only will appear. This managed policy is prewritten json IAM policy maintained by Amazon that helps administrators quickly provide permissions without needing to deep dive into IAM permissions. Perfect for our use case at hand. I’ll check the box for this policy and click next.

The next screen is a review screen and a final Create User button.

After the new IAM user is created the access key and secret key are provided for download. Be careful with these, as AWS access keys are all that is needed to access an AWS account. I will copy the provided access keys into the gedit text editor so I can use them in the next step.


Configuring AWS PowerShell Module Credentials

All the prep work is nearly completed and the next steps are to configure the default region, access key, and secret keys to be used with the AWS PowerShell module cmdlets. To do this we will import the AWSPowerShell.NetCore module and run the Set-AWSCredentials and Initialize-AWSDefaults cmdlets.


Running my custom functions

I need to load my functions into memory so lets use Get-ChildItem to list the functions files and dot source each one. (% in PowerShell is a shorthand alias for ForEach-Object)

To verify my custom functions are loaded and ready to execute we can try to tab complete them. The function I am running in this exercise is Test-RunningEC2InstanceByServerName so I will type Test-Run and press tab.

Success! Tab completion filled out the name of function for me. Lets see if it works…

The Instance hosting this here blog is called PACKETLOST02 so I will send that server name in as a parameter into the function and I am expecting it to return that the instance is running.

The function ran and returned that the instance is running.

Summary

How neat was this? I took some PowerShell functions I wrote on the Windows platform and commited them into my GitHub repo then got them to run on Linux. When I initially wrote these functions it was to help automate my day to day administration of Amazon Web Services. I wrote these functions on the Windows platform with only the Windows platform in mind. Thanks to the great work of the developers at Microsoft and Amazon Web Services these functions are now cross platform.

I hope this post provides a quick glance into how useful and flexible PowerShell can be as well as how promising the future of the .NET core and the .NET standard libraries are to cloud computing. Cheers!

Check the date of a certificate from a polled URL with PowerShell

I recently setup LetsEncrypt on this blog. With all the insecure connection url bar indicators quickly becoming default on the modern browsers, this great open source project really comes through and makes securing your site with a SSL/TLS certificate easy. And of course, in the spirit of open source, the certificates are free!

As part of using LetsEncrypt, you need to automate your certificate renewals. So once I got everything setup and a cron job configured to handle the renewals, I wanted to log the date of my current certificate from a web call on my home computer.

Here is the PowerShell I used to get the certificate date information which then can be logged


Delete ElasticSearch indexes with powershell

So I followed this AWS blog and this documentation to launch a tiny t2 elasticsearch cluster to visualize VPC flow logs. Those links have instructions that guide you along setting up flow logs to flow into ES in a few different ways. I ended up following the documentation link and then downloading some kibana3 dashboards until I found one I liked.

Over time however, the little t2 ES cluster could not keep up, and I ran out of storage space and CPU credits. So I wanted to automate the deletion of indices / indexes so that the cluster would free up storage space and not churn through CPU. With more RAM available the cluster uses less CPU, so I had to limit how much data the single node ES cluster is storing. There is plenty of documentation online on how to use curl to delete elasticsearch indexes but I’m on windows most of the time so I decided to write a quick a powershell script to do it.

To use this script just update the esdomain variable to point to your ES cluster name. Also this filter will only work if the lambda script is creating cwl- indexes. Tweak it if your indexes are different. Run it and it will keep the last 2 weeks of indexes and delete anything older.


Backup your EC2 Amazon Linux WordPress Blog to S3

So I finally decided to run my own Linux server and utilize the AWS free tier for a year.

It was a great learning experience and I wanted to share the most difficult part of the process, backing up my new blog to S3. Automatically of course.

I had just finished configuring my sever how I wanted. I followed these great guides I found on the net to get me up and running.

After I wrote a few posts and configured some plugins on this here blog it was time to figure out how to automate Linux. Something I have never done before.

Step 1) Generate a script to take backups of my site.

This wasn’t easy, and took a few hours of my time. Over an hour of which was finally tracked down to starting my .sh file on a windows system (using notepad++). Apparently the carriage return character on Windows and Linux is different and there was something in this file that made all my files get generated with ‘?’ in the file name. When I tried to download the files being created by the backup script in WinSCP I was greeted with invalid file name syntax errors. It wasn’t until I ran the bash script with sudo that an prompt appeared upon file deletion showing me ‘\r’ was in the file name and not a question mark.

Once I FINALLY tracked down the root cause of my file creation issues I was off to the races. Thankfully during all this I got the hang of Nano (after admitting temporary defeat learning VIM) and was able to easily create a new shell script file from the ssh window and get my script working. Below is the code I ended up with. Mostly based off this LifeHacker article.

Actually starting Step1:

So here is what you need to do to configure automatic WordPress backups to S3. My approach is to backup weekly and keep 1 month of backups on the server and 90 days of backups in S3.

I started off by making a /backups and /backups/files directory in my ec2-user home directory. This folder will hold my scripts and backup files going forward. This is the directory you will be in by deault after you SSH into an amazon linux instance as ec2-user.

With Nano open, copy and paste the below code into nano. Then press Control+X to save the file.

Once the backups.sh file is created, we need to give it execute privileges.

Now we can run it to make sure it works with bash. Or move right onto scheduling it to occur automatically as a cron job.

Checking it with bash:


Step 2) Configuring the script to run automatically

Scheduling it with cron:

First things first for me, scheduling cron jobs is done with crontab. Crontab’s default editor was VIM which is very confusing to a Linux novice such as myself. Lets change the default crontab editor to nano…

And now lets configure our backup shell script to run Sunday mornings at 12:05 AM EST (0505 UTC).

A great guide is found here.

Don’t forget to Control-X to have nano save the edited crontab file. It appears as Amazon Linux automatically elevates to sudo to accomplish crontab changes because I configured everything without sudo.

Now our site is backing up automatically. So lets offload these backups to S3.

Step 3) Syncing the automatic weekly backup files to S3

H/T to this helpful blog post for guidance.

Create an S3 bucket. Then create an IAM user, assign it to a group, and give the group the following policy to restrict it to only having access to the new bucket. Replace the bucketname as needed.

Or you can just use your root IAM credentials, whatever floats your boat.

Next up, install s3cmd onto your Amazon Linux instance. While s3cmd is very useful, its third party developed and not an actual Amazon command line feature, so we have to download it from another repository. We can install s3cmd onto an Amazon Linux instance with the following command.

You will have to accept some certificate prompts during the install.

Once s3cmd is installed we can configure it with our IAM credentials. Don’t worry, with proper restricted IAM credential setup it will fail the configuration check at the end.

Create a shell script to sync our backup files to s3. Make sure we are still in the backups directory and use nano to create the script.

Paste the following code into nano and press Control-X to save. Don’t forget to change the bucket name.

Configure the script to be executed.

Now you can use some of the steps above to execute the script manually to make sure it works or schedule the script to run a few minutes after the backup script via cron.

You can check the logfile with tail for more information.

Wrapping it up

At this point you should have your compressed WordPress database backups and compressed Apache files being created weekly. Then they are being synchronized to S3 shortly after. What if we want to keep the files on S3 longer than the files on the server?

All we need to do is enable versioning on the bucket. Then apply a lifecycle policy to permanently delete previous versions after 60 days. Now we have 90 day backup retention.

Anyway, I hope this helps. I tried to link to all blogs that helped me get up and running.

Cleanup IIS Logs AutoMagically

First head over to the Microsoft Script Gallery and grab deleteold.ps1 by Jaap Brasser.

I tend to copy scripts to c:\scripts on systems so I copied deleteold.ps1 there and created two new batch files there as well.

The first was used to launch the powershell script with switches that will delete all files in the IIS Logs directory older than 90 days and append to a log of all actions taken.

IISLogsCleanUp.bat :

The second batch file registers a task that runs this script weekly. Right click this batch and run as administrator and IIS logs will no longer be a thorn in your side.

IISLogCleanUpTaskReg.bat :


As usual, customize as needed! Next on my list is for this repetitive task is creating a powershell remoting script to copy these files to remote servers and execute the task register command.

VMware Tools Check – PowerCLI Email Report

The last two posts I made utilize PowerCLI and VMware tools to gather information for reporting. So what happens if VMware tools is not running…. things fall through the cracks!

Luckily, we can report on VMware tools status too.