After updating a docker container running on AWS ECS / Fargate, I encountered some erroneous characters in the cloudwatch logs output of the ECS task. When I originally created the dockerfile, the latest version of PowerShell being installed from the Microsoft repo was version 7. The latest container update was running PowerShell 7.2. The amazonlinux container was also updated to the latest version so one of these recent updates within the container had added some leading and trailing characters to the logging output.
Google came up totally empty for me with this one so I am posting this to help out anyone who ends up in the same boat.
The characters showing up in the cloudwatch logs looked like this for the verbose output stream:
[33;1m VERBOSE: Output [0m
And the characters in the standard output stream looked like this:
[32;1m Regular StdOut Output [0m
This line of code added to the top of the script removed all the erroneous characters from the log output.
I’ve been working with Azure DevOps a lot lately and despite the horrible name the product has really grown on me. The improvements to both the Microsoft hosted agents and the yaml pipelines have really made it a better product over the last few years.
I get the suspicion that GitHub and GitHub actions will replace pipelines eventually but that is a topic for another post.
Unfortunately, it can be hard to find good examples or documentation online for some common Azure DevOps pipeline problems since it is not the most popular CI solution on the market.
Recently we had some dotnet core microservices yaml build pipelines running on the Microsoft hosted agents and the builds were really fast. Usually builds are completing in under 2 minutes per run without going out of our way to optimize for speed.
A new microservice came alive and this one needed an angular front end in addition to the dotnet core api. This requirement brought along the need to manage npm modules and build the angular app along with the usual dotnet restore / build / publish steps. After introducing these new npm build steps the pipeline build times tripled.
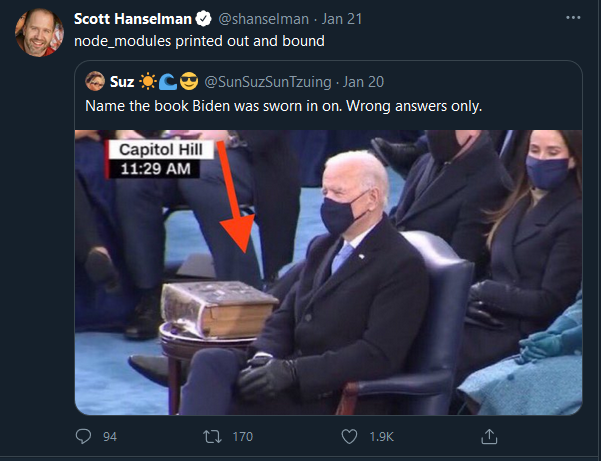
You know what they say about node_modules…
It was time to spend some time optimizing the new pipeline.
The first thing I did was I changed the git checkout depth of the main repo. This usually brings in about 30 seconds to a minute of time saved. The speed benefits of this tweak will vary repo by repo.
Inside this gist are the relevant parts of the steps I ended up using to cut the pipeline run times in half.
After setting up the variable for npm_config_cache the first cache step allows partial cache hits for the npm configuration files. This step is mostly taken directly from the Microsoft documentation linked above.
In my case the files which need to be hashed and used for cache validation were package.json and npm-shrinkwrap.json together. Depending on the project, package-lock.json might be the more appropriate file to hash.
The next caching step was the one where my google searches came up short and I had to figure it out through trial and error. I needed to cache node_modules for the project so that I could skip npm ci (similar to npm install) re-downloading all the modules. This was the most time consuming step of the pipeline changes. With this cache step there are no partial cache hits which is achieved by omitting the restoreKeys input. When there is a cache hit it will populate the pipeline variable MODULES_CACHE_RESTORED.
Later in the pipeline there is a condition on the npm ci step to check the variable MODULES_CACHE_RESTORED and if that variable is ‘true’ indicating a full cache hit, the npm ci and downloading of node_modules is skipped. All the modules come from the cache download which is a much shorter time than running the npm ci step.
The only downside to this approach is that when there is a node_modules cache miss and the project is configured to have npm install also build the project, the pipeline might build the project twice. Node_modules cache misses will happen whenever the node_module definition files change or the pipeline runs in a new branch for the first time.
The other day I needed to launch some one-off Fargate / ECS container tasks with PowerShell. The documentation covered most of what I needed but I could not find any examples on how to override environment variables sent to the container task.
I only needed to change one environment variable so creating a whole new task definition seemed overkill for this purpose. After some trial and error the below code helped me get the job done.
If this helped you out please let me know in the comments. Feedback will motivate me to share solutions on this site more often.
Recently I rebuilt my home CentOS server which I use to run some home media services and keep up on my journey to learn linux. Everything was going well, I moved a few services into docker containers and everything not in a container was installed through package managers.
After a few days I noticed the media service plex would occasionally stop. Reviewing the systemd logs showed it was being killed presumably to allow a yum update to succeed. Oh, “that’s no problem” I thought, “I’ll just edit the systemd unit file to have the appropriate restart always instructions”. Well, I did that and a few days later when my wife and I went to watch a movie the plex media service wasn’t running again.
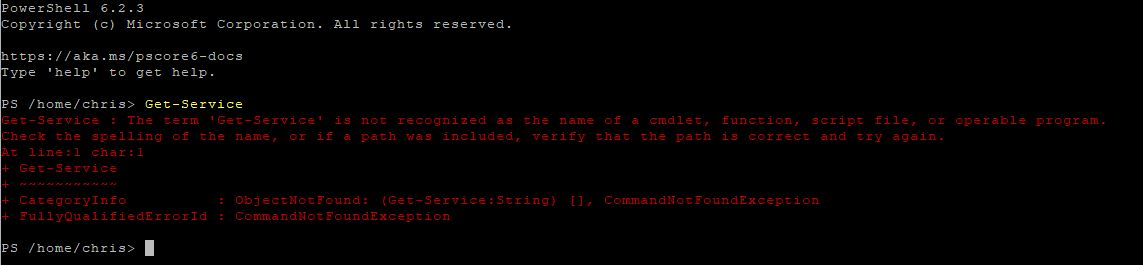
I spent a few minutes thinking on how I wanted to proceed from here and decided I would look at solving the reoccurring problem with PowerShell (Core) on linux. I got the repo configured and powershell installed via yum then started on my task to keep the plex service running.
Once PowerShell was installed I launched pwsh from terminal and tried Get-Service. I was greeted with this error.
Well it looks like PowerShell Core does not support systemd or have the ‘*-Service’ cmdlets on linux. Not to be deterred, I decided I could attempt to parse text to get the job done like a “true linux admin”. A little of what Jeffrey Snover referred to as “Prayer-Based Parsing” in the Monad Manifesto…
5 minutes later I had a script that got the job done and could handle restarting plex if it was ever stopped in the future.
Let’s walk through the code.
Line 1 gets the services output then filters / greps the results and only returns the service I care about which is plex. If I had multiple services that shared a name then I could be more precise and ask for the individual service status directly but for now there is no need. I checked the output of systemctl with plex running and with plex stopped and notice there is no output when the service is stopped. When the service is running the following text is returned:
systemctl output
Shell
1
plexmediaserver.service loaded active running Plex Media Server
Further inspection of the stopped/failed service state shows the string variable will not be null but it also won’t contain any string data. With this in mind, line 2 checks to see if the $plexstatus string variable is 0 characters. When it is 0 characters it will then set the boolean variable $startplex. This boolean will later be used to determine if the script will try to start the service.
To handle the expected condition of the plex service running we can check the output from systemctl and ensure the output indicates that plex service is running. This is where the prayer-based part comes in. Since there are no service objects and state properties available my approach is to fall back to string manipulation. Line 3’s success is very dependent on the text structure returned from the systemctl call. It is also going to use indexes after string splitting which will error if the split does not succeed and there is no resulting array elements that align with index. This is all very sloppy and error prone so it is placed in a try catch block to make sure if the prayer based parsing errors the script still has a path forward. The catch block will set the boolean to try to start the plex service instead of throwing an indexing error.
On line 5, this is a happy path check to make sure the output that has been parsed above contains the word running. If the value is anything but ‘running’ the boolean to start the plex service will be set.
Starting on line 6, the script will start the plex service if any of the failure conditions were met and then save some timestamped log data for future reference. A completely unnecessary else condition with an even more unnecessary Write-Output command brings it home.
Wrapping it all up, the script is set to run in a cronjob every few hours.
I’m sure there are much better ways to do this with standard *nix command line tools but by sticking with what I already know I was able to come up with a solution to my problem in a short period of time using PowerShell.
Its been a while since I’ve posted here. I needed to set default encryption on a bucket in an account that was not being managed by cloudformation and was not making use of kms. Here is the PowerShell that worked since google came up empty for me!
I often see folks looking to get started with source control for their PowerShell scripts. There are a variety of free options out there but the choices get a bit limited when you need private repositories where code remains confidential. If you are like me a lot of your older code might be job specific, contain credentials, or perhaps you never even intend to share your code. None of those reasons are blockers for getting started using source control.
Here is a step by step walk through of using AWS CodeCommit and Git for Windows to make your first private Git Repo.
AWS CodeCommit
AWS CodeCommit is a service which provides fully managed, highly scalable source control and its currently free indefinitely for personal use if you stay under 50 GB stored, 5 user accounts, and 10,000 requests per month. Code is stored in AWS and automatically encrypted at rest. Think of it as private git repositories as a service.
There are a few methods which can be used to access CodeCommit. This guide will focus on HTTPS access with Git credentials instead of using IAM credentials directly. Using HTTPS leaves local Git able to interface with other Git repositories seamlessly.
Creating Your AWS CodeCommit Git Credentials
Assuming you already have an AWS account, navigate to the console and sign in. You can use that link to sign up for a new account and take advantage of AWS’ free tier if you are a new customer.
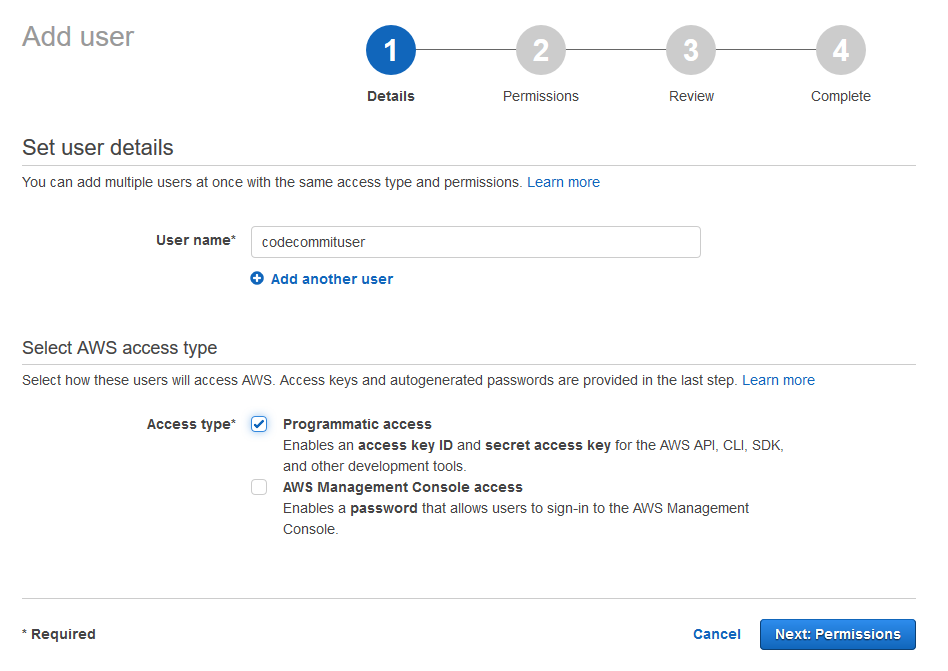
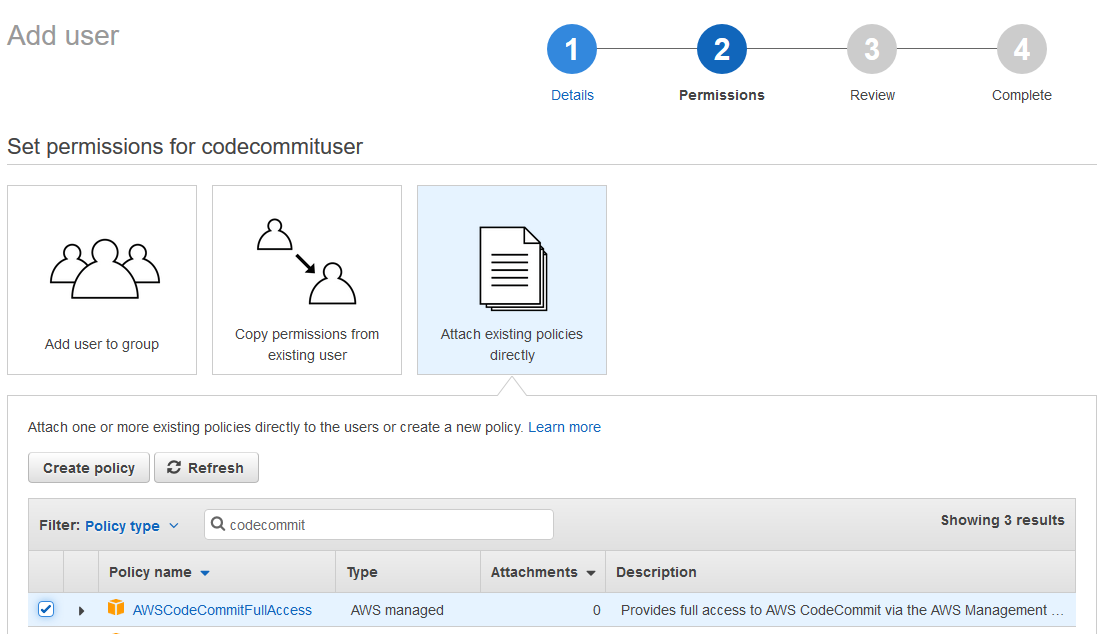
The first step after logging in is to create a new IAM user which will access the CodeCommit service. CodeCommit cannot be accessed over HTTPS from the root account. Head on over to the IAM console.
Within IAM create a new user. I’ll call this user codecommituser and check the box for Programmatic access.
On the permissions page choose “attach existing polices directly” and search for codecommit. I will choose AWSCodecommitFullAccess but another option would be the AWSCodeCommitPowerUser policy which restricts repository deletions.
At the end of the add user wizard IAM credentials are presented for this user. These credentials are not needed so go ahead and click close.
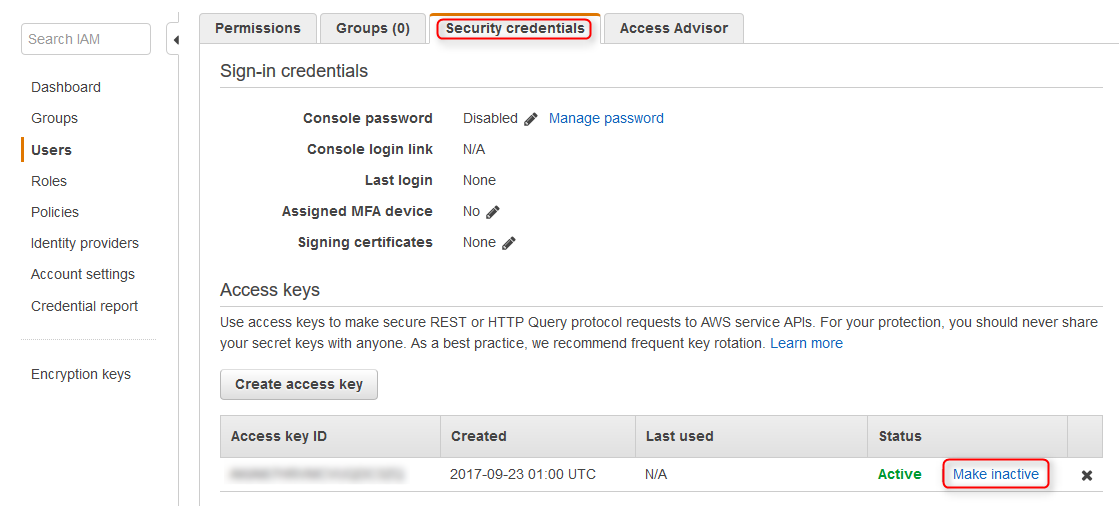
Back in the IAM console under the security credentials tab of the new user disable the IAM keys using the make inactive link.
Further down on the security credentials page locate the HTTPS Git credentials section and use the Generate button. Credentials will be presented in a popup dialog. Save these credentials for later use.
Creating Your First CodeCommit Repository
Back in the AWS services console use the drop down in the top right of the screen to select the desired AWS region to use with CodeCommit. Then search for CodeCommit from the service search bar.
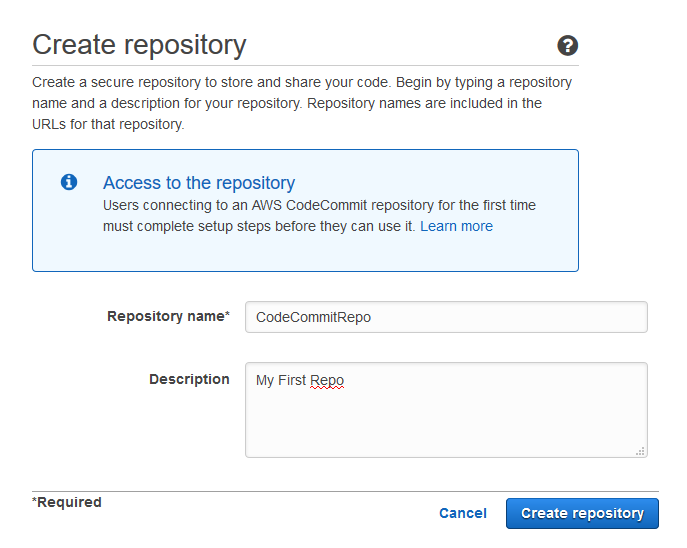
Landing on the CodeCommit service page brings a Getting Started button, clicking the button starts the create repository process. I’ll go ahead and create a repository called CodeCommitRepo in this example.
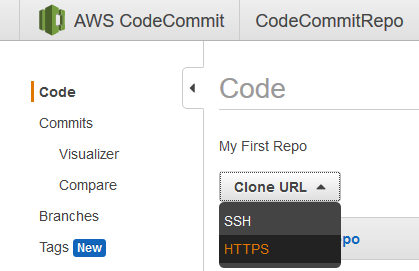
Copy the link that is provided after choosing HTTPS from the Clone URL drop down. Save this link along side the previously saved Git HTTPS credentials.
Cloning a Repo And Making the First Commit
That was a lot of boring prep but now you should have everything you need to start using CodeCommit. If you don’t already have Git installed you will need it. Assuming you are on Windows download and install Git for Windows. The defaults of the installer are fine but make sure to double check the option to ensure the path environment variable will be updated to use Git.
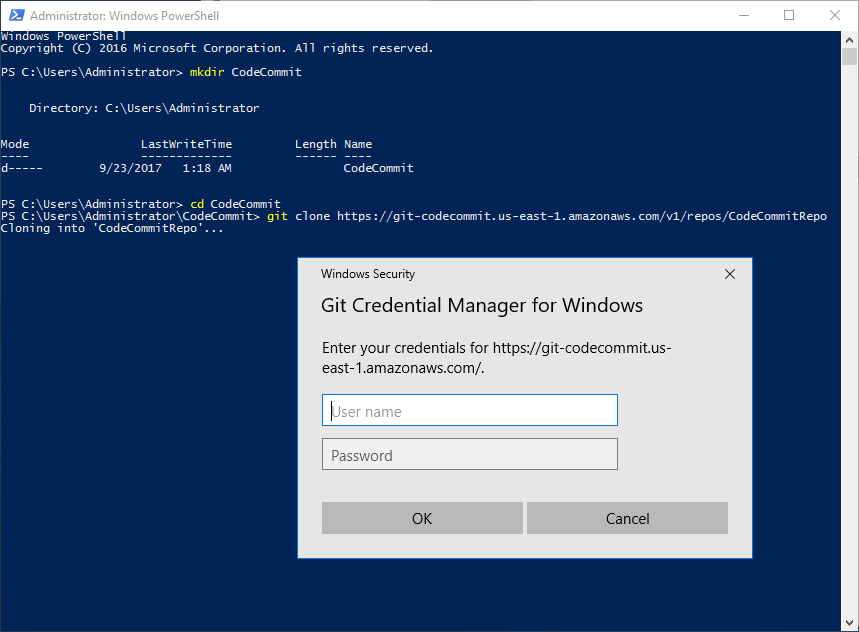
With Git installed I create a new folder to keep the local clone of the new repository. Using PowerShell in this example I create a directory and cd (or set-location) into the new directory. From the new directory I then use “git clone” followed by the Repo url saved earlier.
When Git tries to clone the directory it will prompt for the HTTPS Git credentials.
After entering the credentials Git clones the repo into a new sub-directory. If this is your first time using git set the email and name to attach to commits made to this repo. This can be done with git config within the sub-directory.
PowerShell
1
2
3
cdCodeCommitRepo
git config user.email'chris@example.com'
git config user.name chris
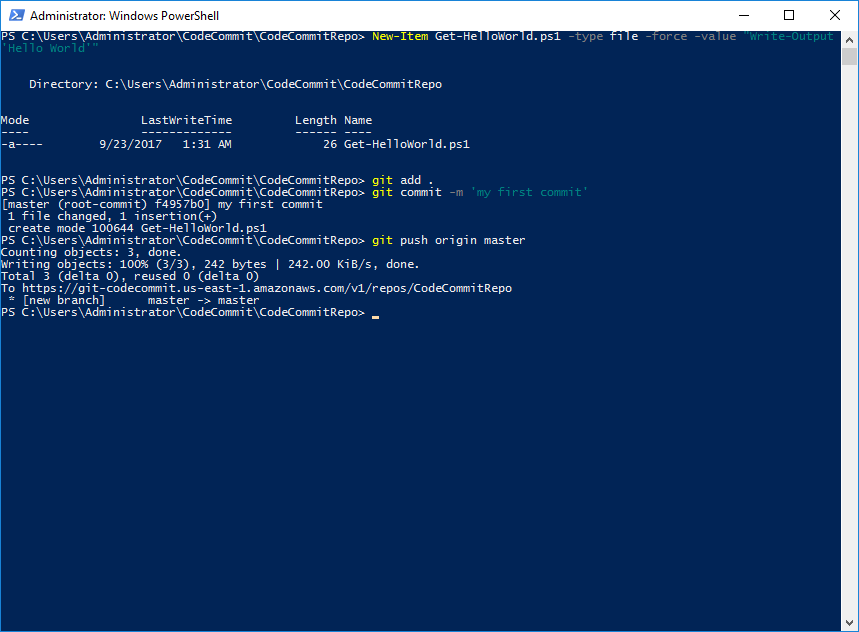
For this walk-through I will create a new script file with PowerShell but I could also copy existing scripts into the directory at this step. Creating a README.md here would also be useful.
Once the files I want stored in CodeCommit are in the cloned repo folder I am ready to start using source control! I use “git add .” to stage all the files in the directory for the next commit. Then “git commit” is used with the -m switch to add a message describing the changes. Finally “git push origin master” sends the commit up to AWS CodeCommit.
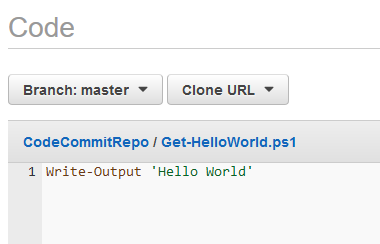
Back in the CodeCommit console will be the newly committed files.
I can now view the contents of synchronized scripts from the console.
Using CodeCommit with Visual Studio Code
Maybe the command line isn’t how you want to work with Git. Its not for everyone. Visual Studio Code has great PowerShell and Git integration and it works smoothly with CodeCommit.
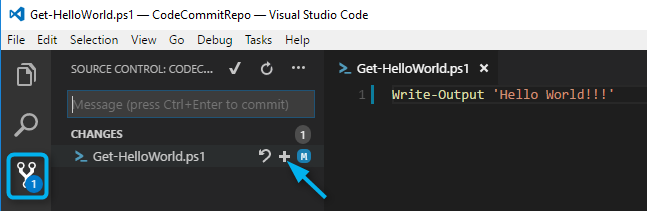
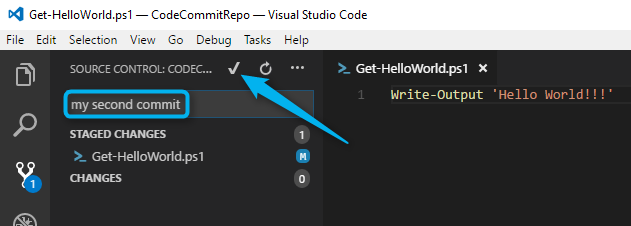
When working with PowerShell scripts in Visual Studio Code it will detect when it is working in a directory that is associated with a Git repo. Here is an example of what happens if I update my Hello World script file. I added some exclamation marks to the script and then saved the changes. The Source Control icon on the left hand side of Code lights up indicating it sees changed files. I can then use the + sign next to the file to stage my changes (git add equivalent).
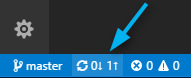
Then with files staged I can add a message and use the check box to commit (git commit -m equivalent).At the bottom of the Window is where I can synchronize changes up to AWS CodeCommit (git push equivalent).
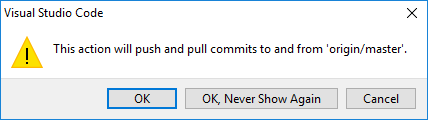
A popup dialog appears for confirmation.
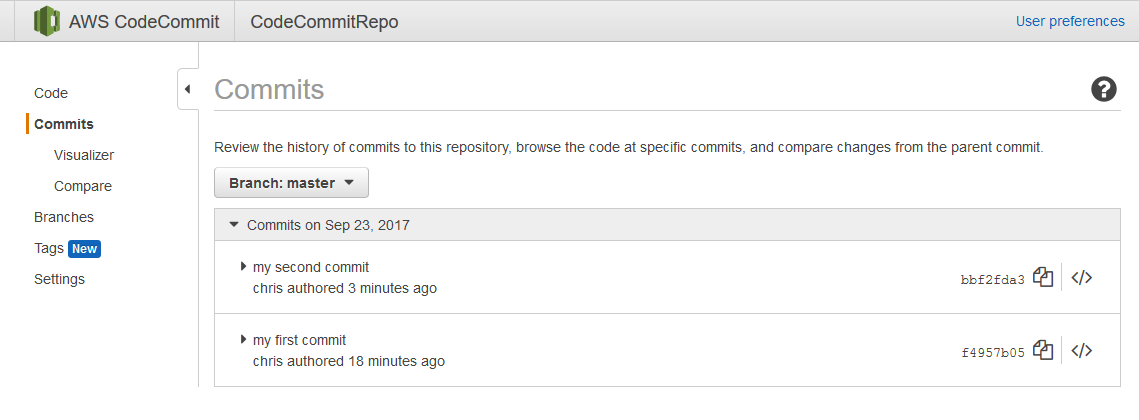
Now back in CodeCommit I can see the commit history and am able to track changes to my scripts.
Summary
In this walk through I created a new IAM user to use with AWS CodeCommit. The new IAM user is left with no access to AWS other then the CodeCommit service through HTTPS authentication. Using HTTPS authentication with CodeCommit enables encrypted file transmission and AWS handles encrypting the storage. Using this solution for source control I gain off site backups and versioning of all my scripts. Best of all its no cost to me provided I can stay under the CodeCommit Free Tier service limits.
AWS CloudFormation is a really powerful service that enables programmatic creation and modification of AWS resources. It is the centerpiece of most AWS “Infrastructure as Code” implementations enabling developers and operations to achieve idempotence with infrastructure.
Common CloudFormation Challenges
Something any newcomer to CloudFormation will discover when starting to learn the service is the sample templates found online will often be outdated. Most CloudFormation templates that are designed for multi region deployment will utilize mappings of AMIs or instance types. These mappings exist to allow the template to take input from stack parameters to achieve different results based on the dynamic input. The latest AMIs for newer instance types change frequently and not all instance types are available in all regions so mappings are used to allow templates to handle as many scenarios as possible. Amazon Web Services is constantly changing and as a result static templates even with well thought out mappings will quickly go out of date as new AMIs are launched into any of AWS’ many regions. Just take a look at Amazon’s whats new page. The speed of change and new features that Amazon delivers is amazing and writing static CloudFormation templates in JSON or YAML just won’t be able to keep up.
Leveraging Amazon SDKs and other third party tools like troposphere can help organizations make better use of CloudFormation. Today I will share an example of how I can use the Amazon Python SDK (boto3) and troposphere to generate dynamic CloudFormation VPC templates that can be kept up to date as new regions and availability zones are added to EC2.
My need for dynamic CloudFormation templates
Something I often find myself doing to keep up with Amazon Web Services is launching spot instances. It is the cheapest way for me to spin up a short lived instance and install a SDK or a new tool I want to try. I want the ability to have VPCs in any region so I can find the cheapest spot instances available for the instance type I want to launch. Spot prices vary by region and availability zone at any given moment and VPCs without VPN connections are free so it is beneficial for me to have launch options in every AZ of every region.
The VPCs I need in each region are fairly simple the requirements are:
An internet gateway attached to the VPC
A subnet created in each availability zone in the region
Network ACLs to allow connectivity to instances in the subnets
Routing from the subnets to the internet gateway for external connectivity
Public IPs assigned to all launched instances by default
The below python script will generate a CloudFormation template that can be used to create a VPC in any available region, using all accessible availability zones in the region. The list of regions and availability zones is queried directly from the AWS APIs. If tomorrow a new availability zone becomes available in any of AWS’s many regions, I can run the template generation script to generate an updated version of the CloudFormation template. The updated template can then be used to update the CloudFormation stack to immediately make use of the new availability zone. The same concept applies to new regions if AWS launches a new region tomorrow I will be able to make use of it immediately without writing any new code.
Walkthrough of using this script to generate a CloudFormation template
Basic Requirements for this script:
Python3 installed and configured
boto3 installed and ec2 describe permissions configured
troposphere installed
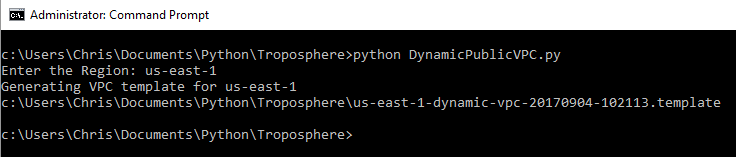
With the above requirements met I can execute the python script to generate a CloudFormation template. The script will prompt for the desired region which in this example I will enter as us-east-1. If an invalid or unavailable region is entered, the script will display a list of valid regions to be used. The script then displays the path to the CloudFormation template that is generated to the current working directory.
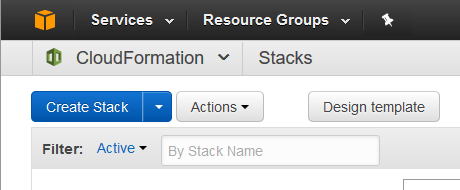
With the template generated I can now head to the CloudFormation console in us-east-1 to launch my spot instance VPC stack. It is also possible to use the Amazon SDK’s to launch this CloudFormation template for true Infrastructure as Code but for this example I will be using the console. From the CloudFormation console I click the Create Stack button.
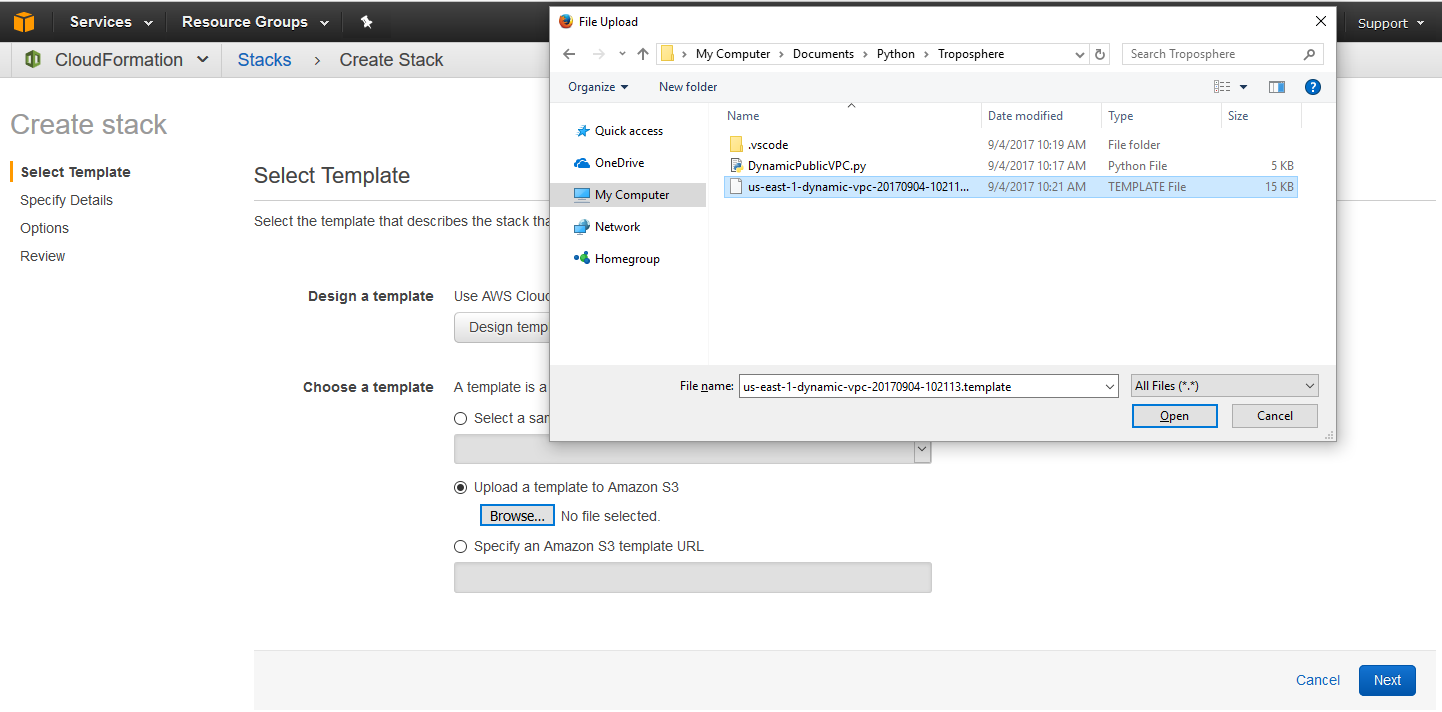
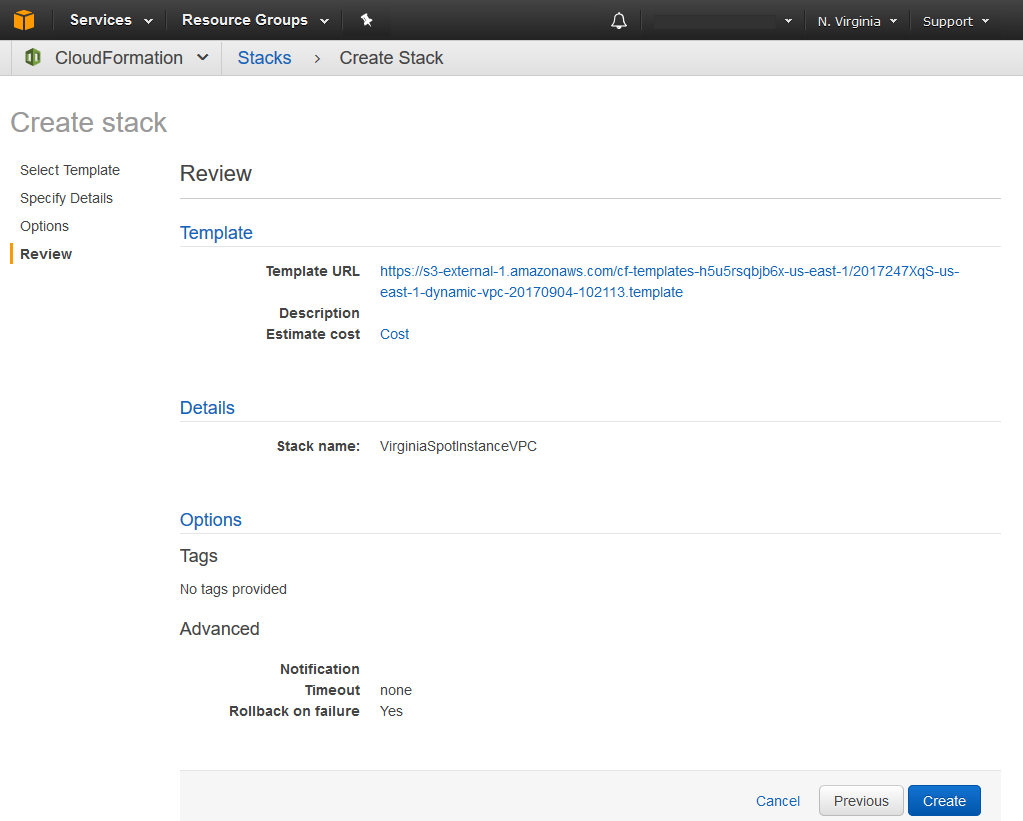
On the next screen I choose “Upload a template to Amazon S3” and click the browse button. Using the file upload dialog popup I can navigate to the file that was displayed from the script execution above and click Open. The file will be automatically uploaded to an S3 bucket for me and its ready to be consumed by CloudFormation to create the stack.
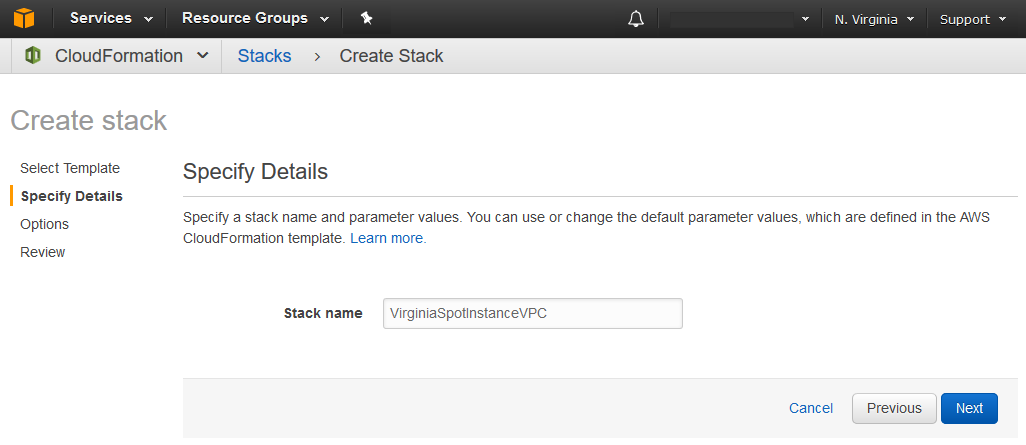
After clicking next I am prompted to input a stack name, lets go with VirginiaSpotInstanceVPC.
The next screen displays some stack launch options, I am taking the default so I omitted the screenshot. The final step of the wizard is a review page. Everything looks good so I am ready to click create and watch CloudFormation works its magic.
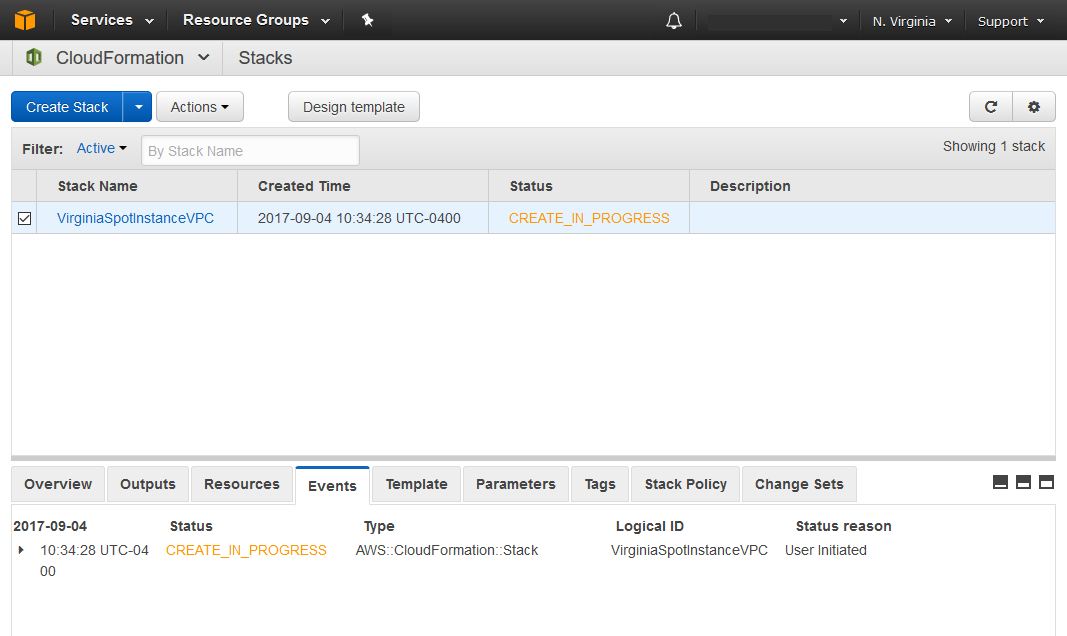
CloudFormation Stack Creation
Once the stack is launched the console will exit the Create Stack wizard and return me to the CloudFormation console where the stack launch status is displayed. At this point the stack creation is still in progress.
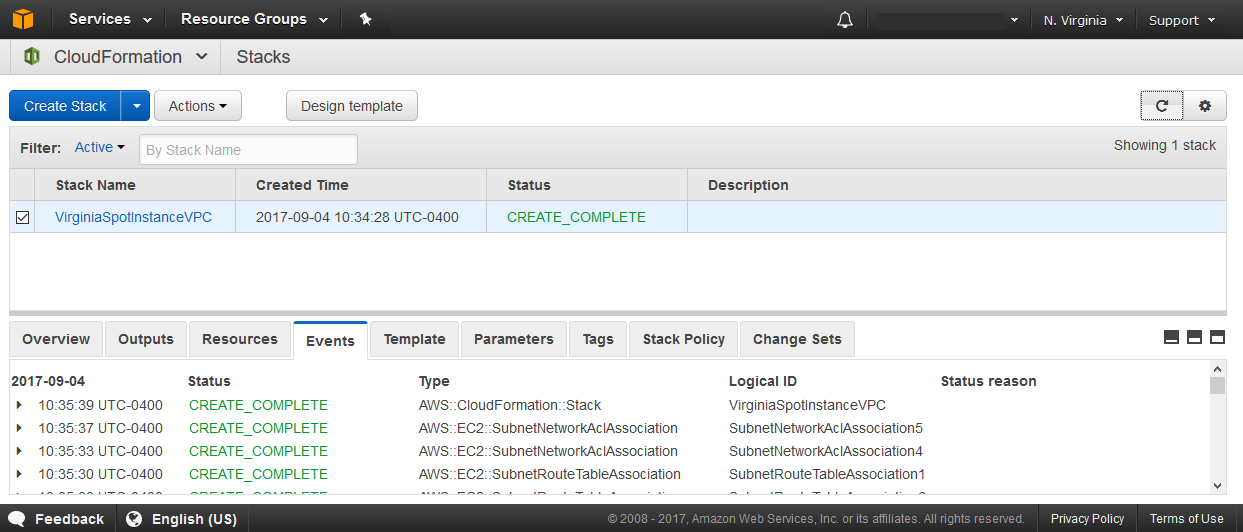
After a minute or so I can utilize the refresh button on the top right of the CloudFormation console to see if the stack creation is done. The events tab can be used to view time stamped logs of the resource types the stack altered.
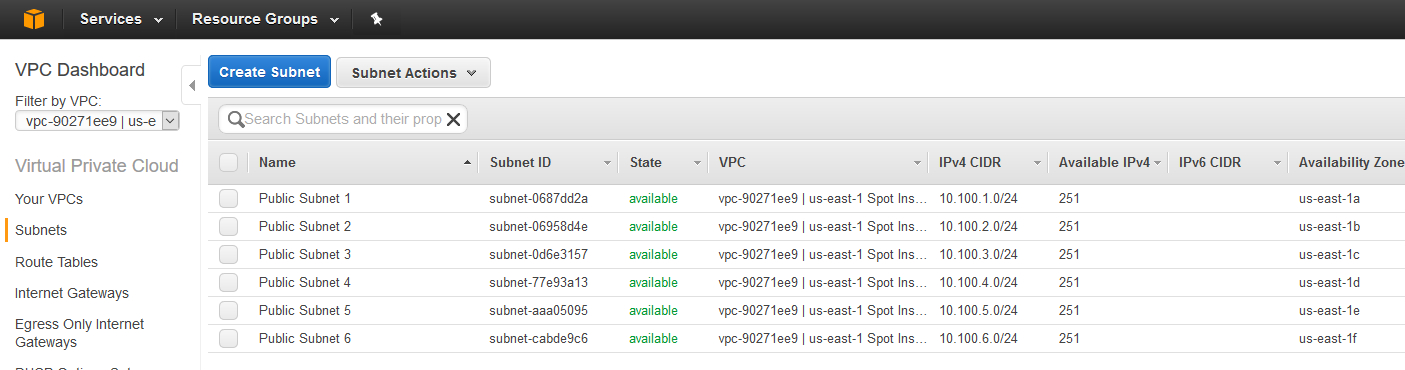
The status is now green / CREATE_COMPLETE so I can go check out my shiny new spot instance VPC in the VPC console of the us-east-1 region.
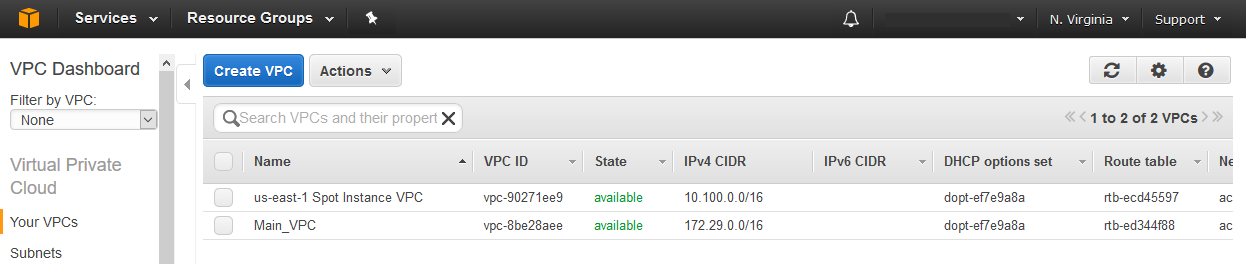
On the left hand side I use the filter dropdown to only display objects that apply to the new spot instance VPC and check on the subnets to make sure I have a subnet in each availability zone in the region. Indeed I do.
Summary
I was able to identify my need for dynamic infrastructure creation and leverage python, boto3, troposphere, and CloudFormation to create templates that should be reusable and update-able for the foreseeable future. The open source troposphere library opens up the possibility of using loops to iterate over returned objects from real-time calls to the AWS APIs with the python AWS SDK. Another benefit of using troposphere is I don’t have to sweat JSON or YAML syntax, I can use my working knowledge of python syntax instead.
Of course nothing is totally future proof in the fast moving field of cloud computing but I think this approach sure beats writing straight JSON or YAML templates and then updating them everytime a new region or AZ is added to AWS.
That wraps it up for this example of using boto3 and troposphere to help manage infrastructure as code.
Below are some of the documentation links I used to create this solution.
Here is a quick gist which will return the SQL servers responding to the request to the PowerShell host.
As written this needs to be run from PowerShell as a user with privileged sql access to run “select @@servername”. Make sure to target a non system database inside an availability group with read only routing configured. The script can target a named instance by appending the instance name to the $server variable at the top.
The first value returned is the server node responding to regular requests without application intent specified. The second value returned is the server node responding to readonly application intent requests.
One of the things that tripped me up early on while learning PowerShell was working with objects. Like most sysadmins I approached learning PowerShell from a scripting mindset. I wanted to run a script and have the script complete a routine task. I thought about PowerShell as a purely procedural language and I mostly ignored objects.
A great characteristic of PowerShell is just how easy it is to get started. You can still get tons of tasks done in PowerShell without a solid grip on objects. But to make progress into the language and get into what most consider intermediate level knowledge there is a need to gain a solid understanding of objects. How does someone without a programming or developer background get to a solid understanding of objects? I mean there are so many kinds of objects. Its not like there is an arbitrary number of times you pass objects over the pipeline before you have them all mastered. No, the best way get comfortable working with objects is learning how to examine them.
Below are the methods I use the most when working with unfamiliar objects.
Method Number 1: IntelliSense in the PowerShell ISE.
This is my go to method of inspecting a simple object. This often is all that is needed to discover to the properties of the object I am after.
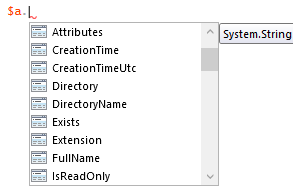
To demonstrate this I will use a practical example of getting the full path to file objects returned from filtering the results of Get-ChildItem. I can save the search results to a variable $a.
With the variable saved I can call the variable with a trailing period and that will start IntelliSense exploration of the object.
This gets me right to the “FullName” property that contains the complete path.
Method Number 2: Get-Member
If using IntelliSense does not get me what I am after, I am probably looking at a more complex object. Maybe its an object that contains other objects. The best way I’ve found to further inspect a object beyond IntelliSense is to pipe it to Get-Member or its alias “gm”.
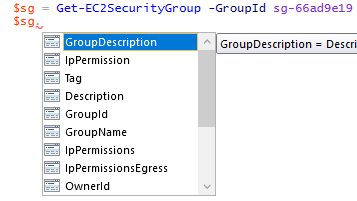
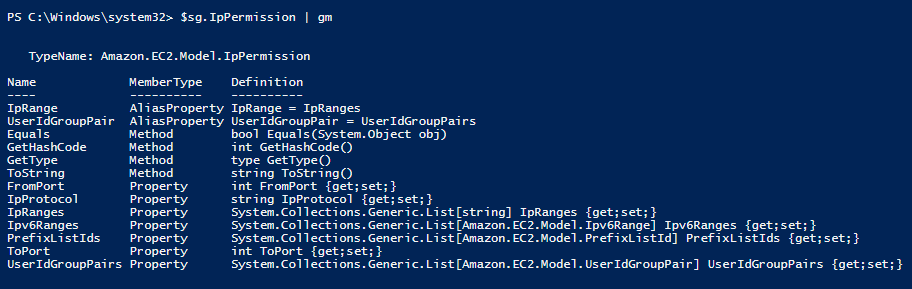
Again I will use a practical example from one of my posts a few weeks back about working with Amazon EC2 security groups. My goal in this example was to create security groups and their inbound/ingress rules. I know from experience that I want to understand Amazon’s objects when working with the AWS Tools for Windows PowerShell before using the cmdlets. So I set out to look at what kind of objects Amazon uses for its EC2 security groups. My first step was to look up a security group with the Get-EC2SecurityGroup cmdlet and save the returning object to a variable.
PowerShell
1
$sg=Get-EC2SecurityGroup-GroupIdsg-66ad9e19
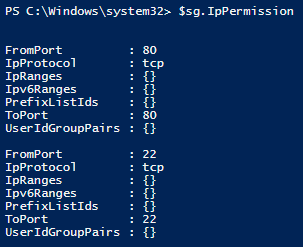
With the object stored in the variable I tried IntelliSense and saw IpPermission properties that looked promising. I have a hunch that this property will reveal how security groups handle their network traffic permissions.
After choosing the property and entering it into the console, I can see it does contain what I am after but its not so straight forward. I see some “{}” in fields where I expect data. Port 80 and 22 match up with my ingress rules on the security group but there are no details on the source security group of the ingress rule.
This is a sign of a more complex object and its time to use Get-Member.
PowerShell
1
$sg.IpPermission|gm
Whoa, this object is quite complex. I can see that this IpPermission property that I am inspecting is an object type unique to itself. Its an Amazon.EC2.Model.IpPermission which is listed at the top of the Get-Member output. This IpPermission has its own set of properties. I think of these as “sub-properties” from the parent security group object. Looking at these “sub-properties” we see they are lists of other object types. Its only going to get more complex from here!
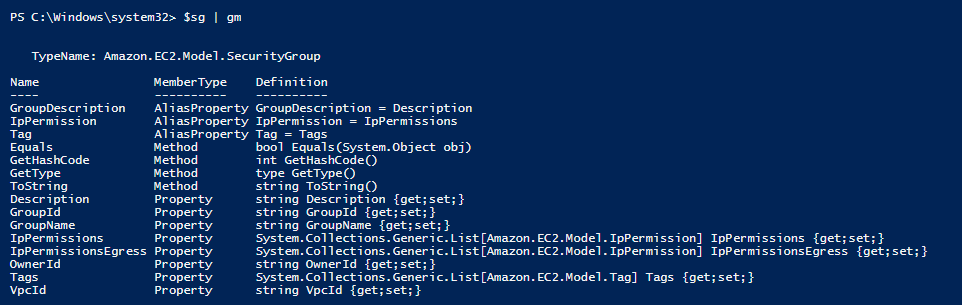
Next I backtrack a step and pipe $sg to Get-Member and see that it is an Amazon.EC2.Model.SecurityGroup.
PowerShell
1
$sg|gm
With the type of the object gained from using Get-Member, I can use a search engine to find my way to Amazon’s documentation of this object’s class. That’s another great source of information about this object. From this point further inspection is a matter of preference. I can keep using Get-Member on all the properties under IpPermission to learn about the object or I can look to Amazon’s documentation about the IpPermission class. Both of these options are valid but I prefer to keep using PowerShell. Continuing down this path of discovering sub properties and piping them to Get-Member might take a while so to save time I can move on to my final and new favorite method of object exploration.
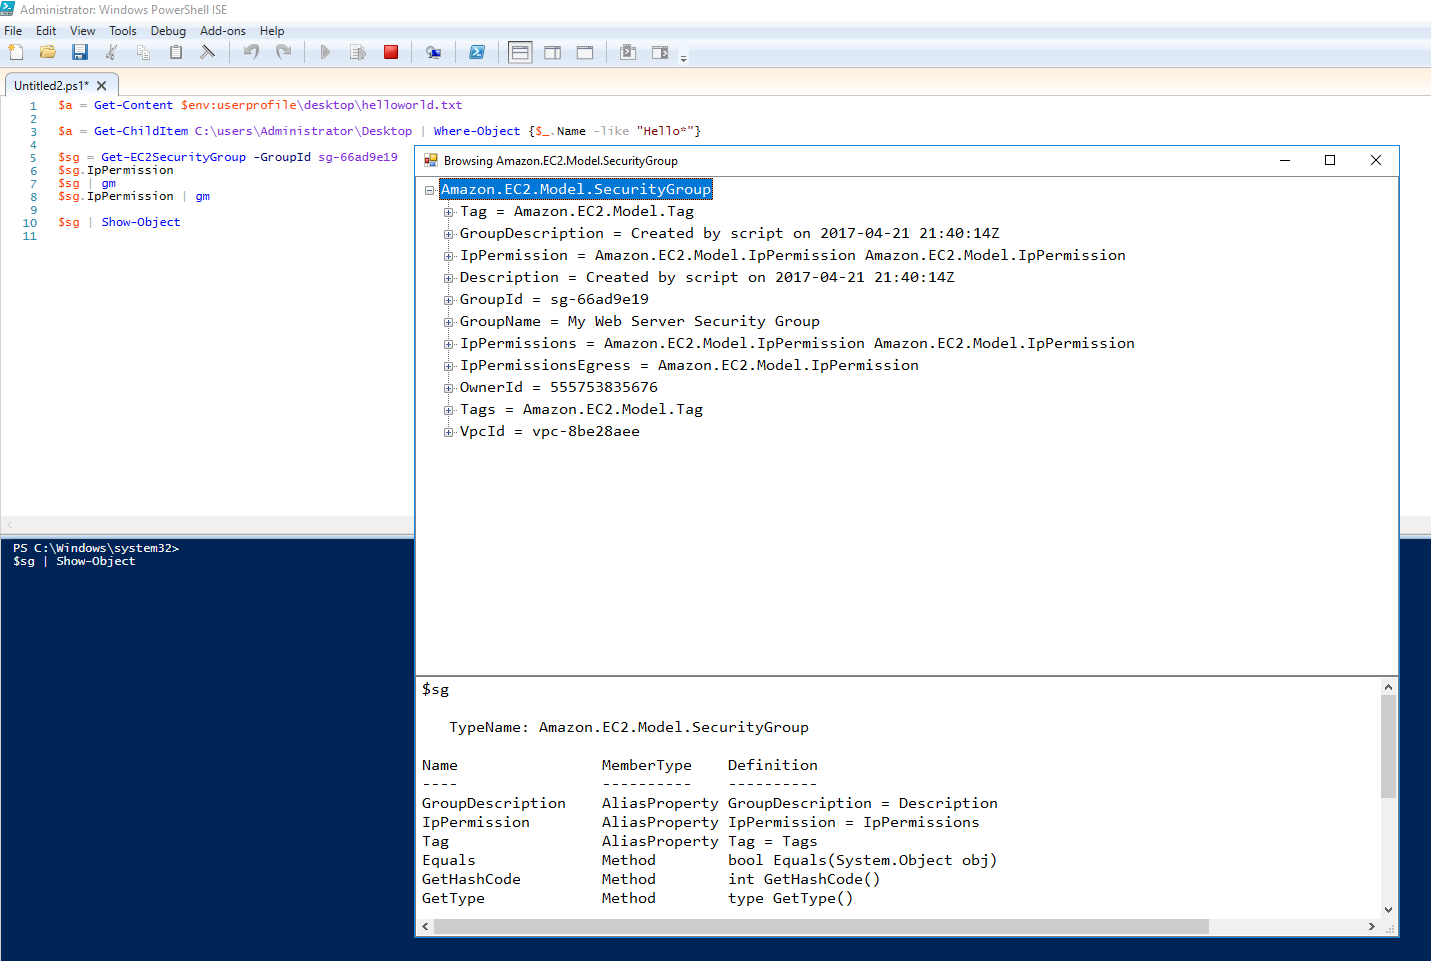
Method Number 3: Show-Object
Show-Object is a great add-on to PowerShell. Its available from the PowerShell gallery as part of Lee Holmes’ PowerShellCookbook module. Its like Get-Member on steroids.
PowerShell
1
$sg|Show-Object
When you pipe an object to Show-Object it will display a tree view of the object in a GUI just like showwindow. You can use the popup window to click through all the properties of the object and discover more details about the object’s inheritance and structure. As you drill into the tree view the bottom pane of the window will update with familiar Get-Member results of each property.
A few clicks later inside the IpPermission property I see information about UserIdGroupPair and I’ve found my source security group allowed for ingress traffic. This is “sg-fda89b92” in the image above. It is in a form I did not initially expect. With all the information I have gained from these discovery methods its was only a matter of time before I had a great understanding of this previously completely unknown object type.
A few weeks ago I was browsing some threads discussing reddit’s april fool’s day /r/place experiment. I was interested in seeing some of the overlay scripts people whipped up on short notice and found myself in a script discussion thread. In this thread I came across a redditor giving others a heads up that if you are ever searching for python programming terms and google asks you if you are up for a challenge, say yes, because it is a job interview. I thought that was really interesting so I did some research and came across a few older hacker news threads discussing this practice and this article that confirmed this thing existed.
As I am just venturing down the road of learning python (I started learning less than a month ago), I find myself googling almost everything related to the code I am writing. If this thing is real I am probably going to see it eventually…
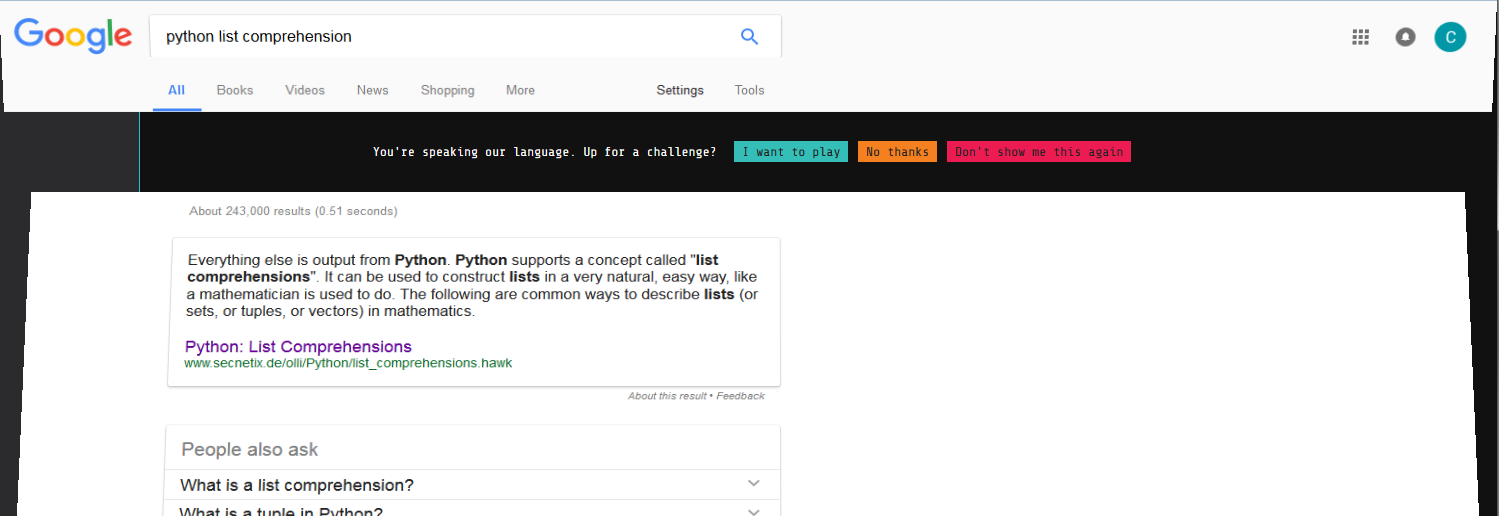
Fast forward to today and I am working on writing an AWS lambda/boto function in python and needed a reminder on list comprehension syntax. I went to google and searched python list comprehension. As I snapped my cursor to click the first link, I saw the page morph. I was instantly reminded of the foobar challenge and knew I had just been invited. Unfortunately I had clicked too fast and left the search results page. I went back and refreshed and re-searched but the invite was gone!
I went to lunch and pondered over what a fun learning opportunity I missed. When I got back to my desk, I went back to google to retrace my steps, hopeful the invites were google account linked and perhaps I would get another invite. I never technically “declined” my invite I just missed it. Sure enough, one google search later, I had my invite. This is what it looked like.
After accepting the invite I was taken to google’s foobar challenge site. It was a web app with a very minimalist feel. I was greeted with what looked like a linux command prompt so I typed “ls”. It listed a bunch of files, one called journal.txt and another called start_here.txt. Using “cat” on these files start_here.txt gave me instructions on how to request a challenge and journal.txt set the stage for challenges plot line.
LEVEL 1
=======
Success! You’ve managed to infiltrate Commander Lambda’s evil organization, and finally earned yourself an entry-level position as a Minion on her space station. From here, you just might be able to subvert her plans to use the LAMBCHOP doomsday device to destroy Bunny Planet. Problem is, Minions are the lowest of the low in the Lambda hierarchy. Better buck up and get working, or you’ll never make it to the top…
Next time Bunny HQ needs someone to infiltrate a space station to rescue prisoners, youre going to tell them to make sure stay up for 48 hours straight scrubbing toilets is part of the job description. Its only fair to warn people, after all.
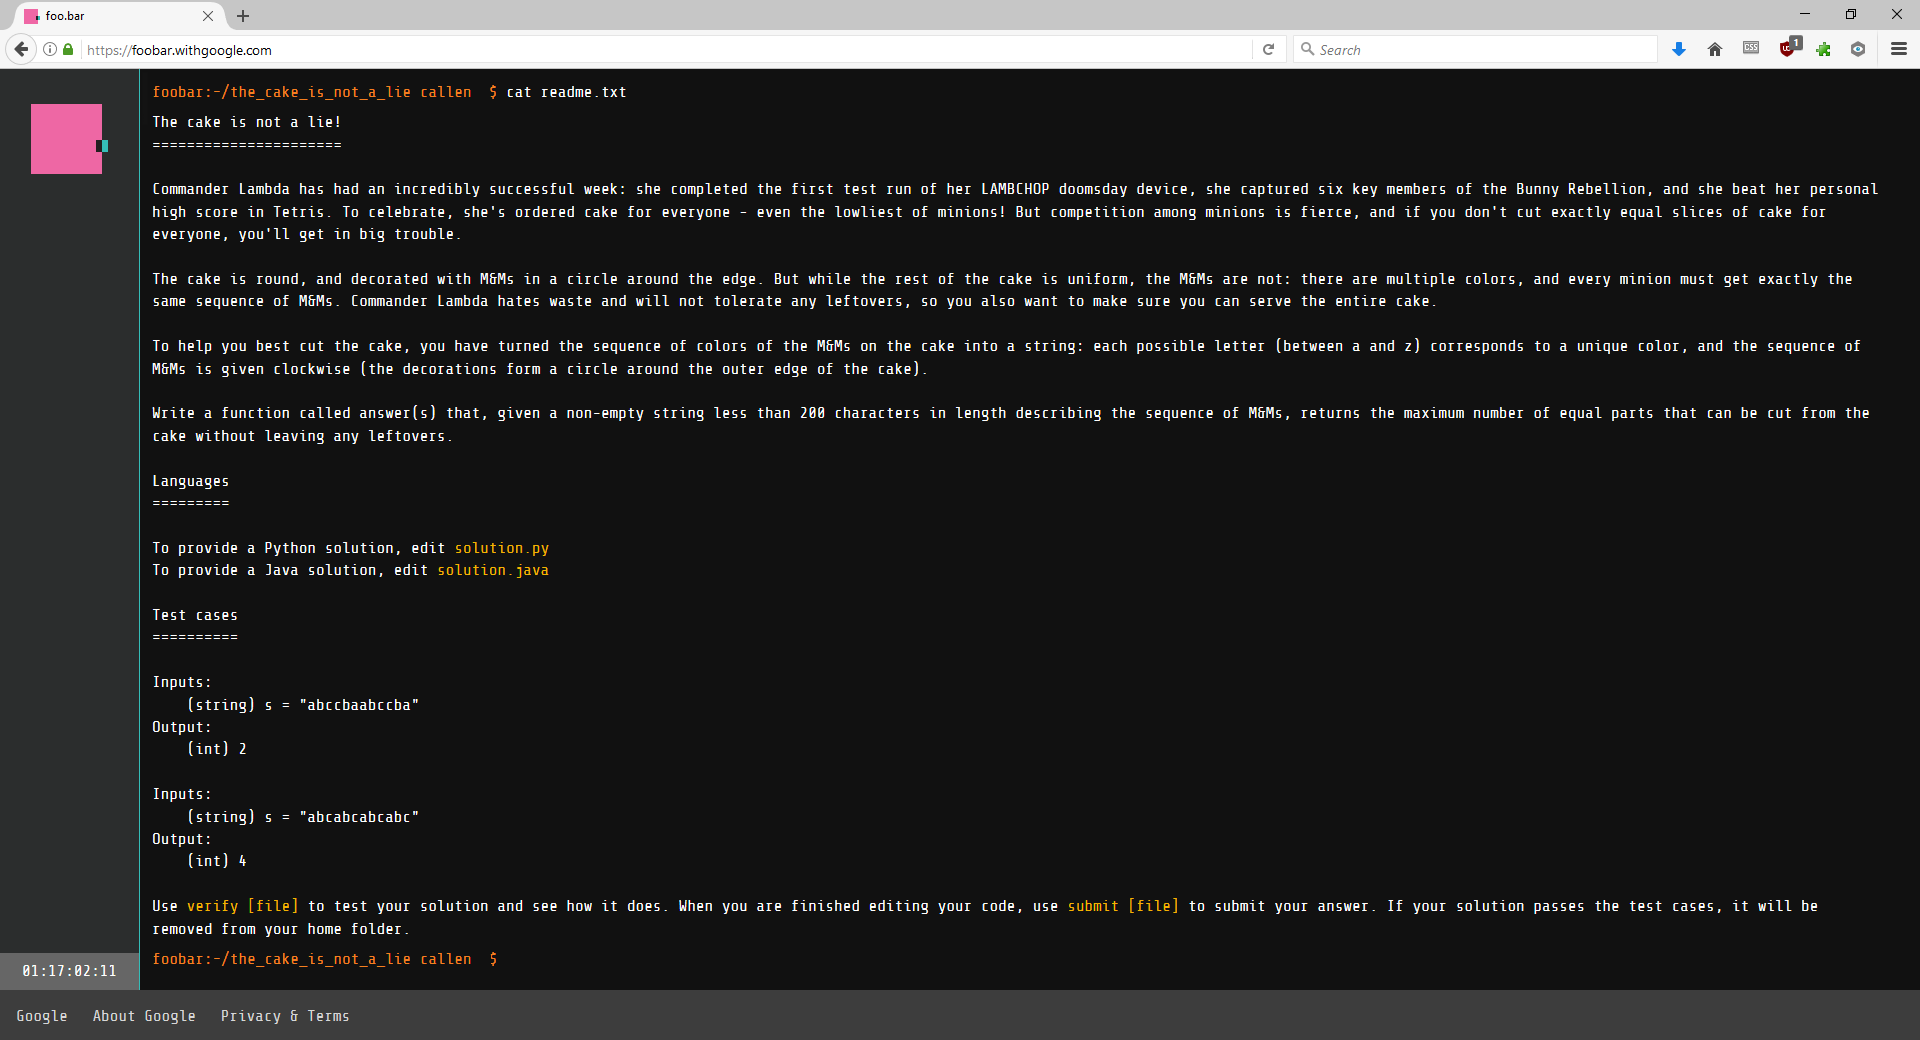
I followed the instructions and requested a challenge. I was given “the cake is not a lie!” challenge as my level 1 challenge. A timer appeared on the lower left hand side of the screen, indicating I had 48 hours to solve this challenge. A new directory was created in my home directory of this virtual terminal. Here is what the challenge looked like.
The cake is not a lie!
======================
Commander Lambda has had an incredibly successful week: she completed the first test run of her LAMBCHOP doomsday device, she captured six key members of the Bunny Rebellion, and she beat her personal high score in Tetris. To celebrate, she’s ordered cake for everyone – even the lowliest of minions! But competition among minions is fierce, and if you don’t cut exactly equal slices of cake for everyone, you’ll get in big trouble.
The cake is round, and decorated with M&Ms in a circle around the edge. But while the rest of the cake is uniform, the M&Ms are not: there are multiple colors, and every minion must get exactly the same sequence of M&Ms. Commander Lambda hates waste and will not tolerate any leftovers, so you also want to make sure you can serve the entire cake.
To help you best cut the cake, you have turned the sequence of colors of the M&Ms on the cake into a string: each possible letter (between a and z) corresponds to a unique color, and the sequence of M&Ms is given clockwise (the decorations form a circle around the outer edge of the cake).
Write a function called answer(s) that, given a non-empty string less than 200 characters in length describing the sequence of M&Ms, returns the maximum number of equal parts that can be cut from the cake without leaving any leftovers.
Languages
=========
To provide a Python solution, edit solution.py
To provide a Java solution, edit solution.java
Test cases
==========
Inputs:
(string) s = “abccbaabccba”
Output:
(int) 2
Inputs:
(string) s = “abcabcabcabc”
Output:
(int) 4
Use verify [file] to test your solution and see how it does. When you are finished editing your code, use submit [file] to submit your answer. If your solution passes the test cases, it will be removed from your home folder.
I read over this challenge and knew this was no task for work. This was going to be a brain twister for a python novice such as myself and I’m not being paid to play python games afterall. My immediate schedule is quite busy and I didn’t have a ton of time to spend on this, so I decided to think on this challenge on my commute home.
I thought about the intricacies of this problem while dealing with my daily dose of New Jersey’s rush hour. The function would need to return 0 if the cake could not be cut without leftovers or if the string was empty. I needed to identify possible M&M patterns from the input string. The pattern surely could not be longer than half the length of the string. I needed to check to see if there were remainders (probably with a modulus) when chopping the string with the possible patterns and discard those results. I had to wrap the string somehow because the function needed to iterate over all possible starting points of the string to find valid solutions. There would be edge cases / test cases on that part I was sure due to the way it was stated on the description that the M&Ms were laid out clockwise. As such a python beginner, who had to google list comprehension syntax to get here, I knew I wasn’t solving this in the few hours of free time I had in the next two days.
So I did what anyone in IT does when they don’t know a solution off the top of their head, I went to the search engines to discover some discussions on this problem. A quick search later and I found this stackoverflow question with a valid java answer by Jawad Le Wywadi. Further searches for a python solution turned up blank. In the end, this blog post may very well change that.
Here is the example code from the stack overflow question written in java:
Java solution
JavaScript
1
2
3
4
5
6
7
8
9
10
11
12
13
14
15
16
17
18
19
20
21
22
23
24
intresult=-1;
intlen=s.length();
for(inti=len;i>0;i--){
intn=len/i;
if(n*i==len){
booleanvalid=true;
Stringpart=s.substring(0,n);
for(intj=1;j<i;j++){
if(!s.substring(j*n,j*n+n).equals(part)){
valid=false;
break;
}
}
if(valid){
result=i;
break;
}
}
}
Well, with a possible answer in hand, I still wanted to at least have somewhat of a challenge so I decided to see if I could turn this solution into a valid python solution to the problem. There was a text file with constraints listed, so I would need to take those into consideration. Notably for me was the fact that this needed to run on python 2.7.6
Java
====
Your code will be compiled using standard Java 7. It must implement the answer() method in the solution stub.
Execution time is limited. Some classes are restricted (e.g. java.lang.ClassLoader). You will see a notice if you use a restricted class when you verify your solution.
Third-party libraries, input/output operations, spawning threads or processes and changes to the execution environment are not allowed.
Python
======
Your code will run inside a Python 2.7.6 sandbox.
Standard libraries are supported except for bz2, crypt, fcntl, mmap, pwd, pyexpat, select, signal, termios, thread, time, unicodedata, zipimport, zlib.
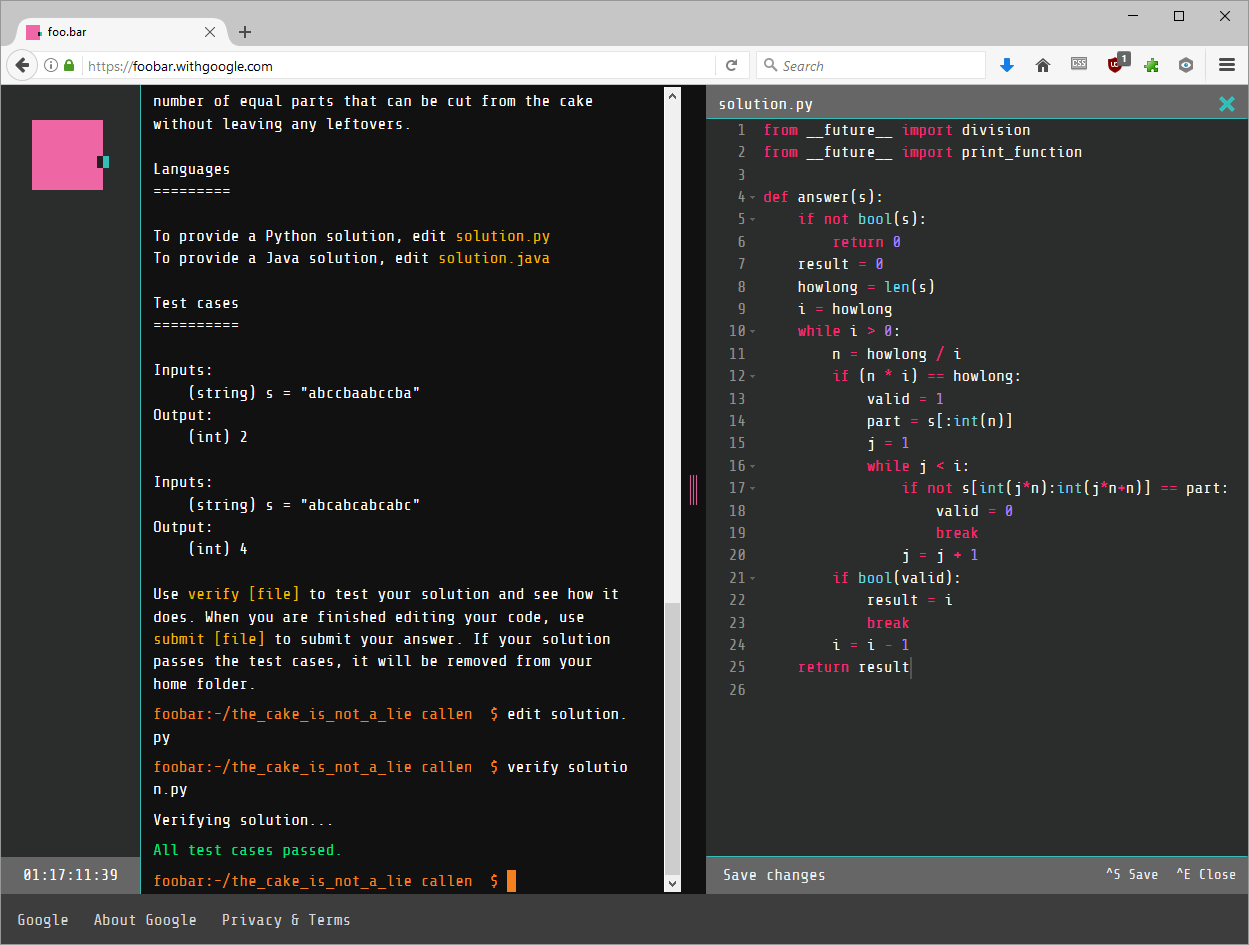
After a few more searches and some quick print debugging, I was getting closer. While I know I had zero chance of coming up with this solution on my own with my current time constraints, I was still able to learn a bit of python syntax from this challenge when converting the java code into a python solution. The python code was solving all the inputs I threw at it despite being overly verbose and unoptimized. Here is that code
I used the foobar editor to put my code into solution.py and ran the verify command to see if I had a solution.
Well look at that, All test cases passed! I had indeed googled my solution to google’s challenge.
After verifying my solution, I submitted it to move on to level 2, and was greeted by a jumping ASCII bunny on the terminal. Who doesn’t love ASCII art?
For this next challenge level, I am going to wait until I have a free weekend and proper time to possibly come up with my own solution.